
Summary (for the skimmers): This expansion joint installation guide shows exactly how to select, prepare, install, and maintain expansion joints so they last. Follow the steps below to avoid leaks, flange damage, and premature fatigue—plus links to deep-dive guides on selection, pump connectors, and pipe guides.
Step 1: Choose the Right Joint (start with the selection guide)
The first step in any successful install is choosing the correct joint for your media, temperature, movement, and pressure window. The wrong joint won’t just underperform—it can introduce stresses that cause leaks or early failure.
Use our Expansion Joint Selection Guide for a 5-point checklist to match material, design, and end connections to your application. For background standards, see ASME B31.3 Process Piping.
Step 2: Add Pump Connectors where vibration is present
In many systems, vibration is as damaging as thermal growth. Pump connectors isolate vibration, absorb minor misalignment, and protect seals and bearings from premature wear.
See our Pump Connectors Guide for when to use metal vs. rubber, quick sizing, and installation practices that extend pump life.

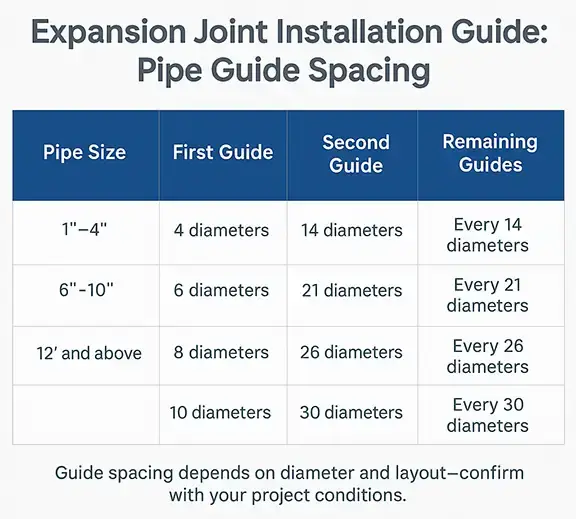
Step 3: Design Pipe Guides & Anchors (critical to this expansion joint installation guide)
Expansion joints absorb movement, but they don’t control it. Pipe guides control the direction of movement; anchors absorb pressure thrust. Together, they keep the joint operating inside its movement envelope.
Use the spacing rules and anchor tips in our Pipe Guides & Anchors Guide. Typical first-guide distances are 4–10 pipe diameters from the joint (size-dependent), with additional guides at charted intervals.
Step 4: Pre-Install Preparation
- Verify movement capability against calculated thermal expansion.
- Align piping so the joint isn’t forced into compression, extension, or lateral offset during install.
- Clean flanges or weld ends to protect sealing surfaces.
- Mark neutral length so installers know the correct installed dimension at mean temperature.
Step 5: Install with Precision (core of the expansion joint installation guide)
- No torsion — never twist the joint to make bolt holes align; rotate flanges or re-align piping.
- Neutral length positioning — set at mean temperature to allow both expansion and contraction.
- Even torque — tighten bolts in a star pattern to avoid flange distortion.
- Fit control/limit rods when required — especially where thrust loads are uncertain.
Step 6: Inspect & Maintain
After startup, inspect for leaks, alignment, and movement. Re-torque if needed after the first thermal cycle.
- Visual checks — look for over-extension, lateral misalignment, or braid wear.
- Intervals — inspect annually; replace if there’s visible damage or loss of flexibility.
- Documentation — record torque values, neutral length, guide locations, and adjustments.
Downloadable Resources & Checklists
- Expansion Joint Installation Checklist (PDF)
- Pipe Guide Spacing Chart (PDF)
- Anchor Design & Thrust Calculation Worksheet (PDF)
Ready to start your project right?
EFP can supply the joint and the complete install plan—guides, anchors, and torque specs—so your system runs longer with fewer failures.
Frequently Asked Questions (from our expansion joint installation guide)
How do you install an expansion joint?
Align the piping, set the joint at neutral length, apply even bolt torque in a star pattern, and ensure guides and anchors are installed to spec.
What are the most common expansion joint failures?
Over-extension, misalignment, torsion during installation, and the absence of pipe guides/anchors are the top causes of premature failure.
How far should the first pipe guide be from an expansion joint?
Typically 4–10 pipe diameters depending on pipe size. Confirm using our Pipe Guides & Anchors Guide and spacing chart.